Inhaltsverzeichnis
Verfügbare Sprachen
Verfügbare Sprachen
Quicklinks
1/3" CCD BLACK-
AND-WHITE OBSERVATION
CAMERA
1/3" CCD-SCHWARZ-WEISS-
ÜBERWACHUNGSKAMERA
1/3" CAMÉRA DE SURVEILLANCE
NOIR ET BLANC
1/3" TELECAMERA DI
VIDEOSORVEGLIANZA CCD
INSTALLATION
INSTRUCTIONS
Groupe Bisset
98 Ter, boulevard Héloïse 95103 Argenteuil Cedex France
(33) 0134/234747 FAX (33) 0134/234745
Casarotto Security
Via Treviso, 2/4 31020 San Vendemiano (Treviso) Italy
(39) 0438/410245 FAX (39) 0438/370471
Intervision
445 Oakshott Place, Walton Summit Bamber Bridge, Preston PR5 8AT Lancashire, England
(44) 01772/861999 FAX (44) 01772/863176
VideV GmbH
Großenbaumer Weg 10 D-40472 Düsseldorf Germany
(49) 0211/41509-0 FAX (49) 0211/424019
KC-3PE
INSTALLATIONSANLEITUNG
INSTRUCTIONS D'INSTALLATION
ISTRUZIONI PER L'INSTALLAZIONE
Deutsch
Inhaltsverzeichnis
Fehlerbehebung

Verwandte Anleitungen für Ultrak KC-3PE


Inhaltszusammenfassung für Ultrak KC-3PE
- Seite 1 KC-3PE 1/3" CCD BLACK- AND-WHITE OBSERVATION CAMERA 1/3" CCD-SCHWARZ-WEISS- ÜBERWACHUNGSKAMERA 1/3" CAMÉRA DE SURVEILLANCE NOIR ET BLANC 1/3" TELECAMERA DI VIDEOSORVEGLIANZA CCD INSTALLATION INSTALLATIONSANLEITUNG INSTRUCTIONS INSTRUCTIONS D’INSTALLATION ISTRUZIONI PER L’INSTALLAZIONE Groupe Bisset 98 Ter, boulevard Héloïse 95103 Argenteuil Cedex France...
-
Seite 2: By Ultrak All Rights Reserved Printed In Korea
ÜBERARBEITETE AUSGABEN KÖNNEN SOLCHE ÄNDERUNGEN BEINHALTEN. TOUS DROITS RESERVES. AUCUNE PARTIE DE CETTE PUBLICATION NE PEUT ÊTRE REPRODUITE PAR QUELQUE MOYEN QUE CE SOIT SANS ACCORD ECRIT DE ULTRAK. LES INFORMATIONS SONT REPUTEES VRAIES. TOUTEFOIS,UTRAK NE PEUT PAS ÊTRE TENU RESPONSABLE DE TOUTES CONSÉQUENCES RÉSULTANT DE LEUR UTILISATION. -
Seite 3: Inhaltsverzeichnis
TABLE OF CONTENTS PURPOSE......................7 SYSTEM INSTALLATION .................. 7 MANUAL IRIS LENS ADJUSTMENT..............9 VIDEO-TYPE AUTO IRIS LENS INSTALLATION AND ADJUSTMENT ..... 9 DC IRIS LENS INSTALLATION AND ADJUSTMENT........11 BACK FOCUS ADJUSTMENT ................12 ZOOM LENS BACK FOCUS ADJUSTMENT.............12 AUDIO DISABLE ADJUSTMENT ..............13 TROUBLESHOOTING..................14 PREVENTIVE MAINTENANCE .................14 SPECIFICATIONS ....................15... - Seite 4 INDICE FUNZIONE......................41 INSTALLAZIONE DEL SISTEMA ................41 REGOLAZIONE MANUALE DELL'OBIETTIVO CON IRIDE........43 INSTALLAZIONE E REGOLAZIONE DI OBIETTIVI CON IRIDE AUTOMATICO DI TIPO VIDEO .....................44 INSTALLAZIONE E REGOLAZIONE DELL'IRIDE C.C........45 REGOLAZIONE DEL FUOCO POSTERIORE.............46 REGOLAZIONE DEL FUOCO POSTERIORE DELL'OBIETTIVO DI INGRANDIMENTO ..................47 REGOLAZIONE DI DISABILITAZIONE AUDIO...........48 LOCALIZZAZIONE GUASTI................49 MANUTENZIONE PREVENTIVA ................49...
- Seite 5 THIS PAGE INTENTIONALLY LEFT BLANK...
- Seite 6 COMPLYING WITH ALL FEDERAL, STATE AND LOCAL LAWS AND STATUTES CONCERNING THE MONITORING AND RECORDING OF VIDEO AND AUDIO SIGNALS. ULTRAK SHALL NOT BE HELD RESPONSIBLE FOR THE USE OF THIS PRODUCT IN VIOLATION OF CURRENT LAWS AND STATUTES. English...
-
Seite 7: Purpose
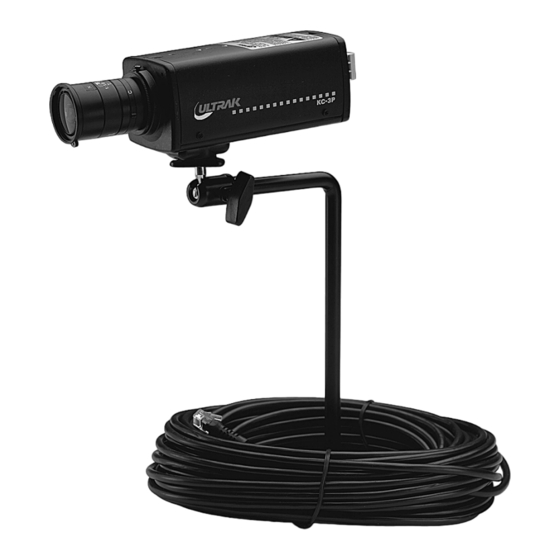
Excellent picture quality • Two-year warranty This manual describes how to set up and operate the KC-3PE camera. SYSTEM INSTALLATION Installation of the KC-3PE camera must be performed by qualified service personnel in accordance with all local and national electrical and mechanical codes. - Seite 8 FIGURE 1. KC-3PE CAMERA English...
-
Seite 9: Manual Iris Lens Adjustment
C. The KC-3PE observation camera has a camera mounting block attached to the bottom of the camera housing. The ¼”-20 UNC threaded mounting hole attaches to the bolt on the camera stand or mounting bracket. -
Seite 10: Dc Iris Lens Installation And Adjustment
Reset the level control as noted in step E. DC IRIS LENS INSTALLATION AND ADJUSTMENT The KC-3PE camera supports dc iris lenses. Perform the following steps to install and adjust a dc-type auto iris lens. Thread the dc iris lens to the lens mount on the front of the camera. -
Seite 11: Back Focus Adjustment
D. The EI switch should be in the OFF position. Apply power to the KC-3PE camera. Adjust the dc Iris lens for an optimum picture. Use the IRIS LEVEL control on the back of the camera for optimum picture quality. -
Seite 12: Zoom Lens Back Focus Adjustment
If a picture is visible, focus on the picture. If the picture is not visible, open the iris on the lens. Open the lens as wide as possible by adjusting the iris ring on the lens for the brightest picture or by placing the welders glass in front of the lens and forcing the lens to automatically open. -
Seite 13: Audio Disable Adjustment
AUDIO DISABLE ADJUSTMENT The audio from the camera may be disabled for use with a camera housing. Remove the two Phillips-head screws on top of the camera. Remove the two Phillips-head screws from each side of the camera. C. Remove the top half of the camera case. If an intercom station is to be used skip to step G. -
Seite 14: Troubleshooting
SECTION 2 TROUBLESHOOTING AND MAINTENANCE TROUBLESHOOTING If problems occur, verify the installation of the camera with the instructions in this manual and with other operating equipment. Isolate the problem to the specific piece of equipment in the system and refer to the equipment manual for further information. -
Seite 15: Specifications
SPECIFICATIONS Dimensions (WxHxD) 58 x 52 x 123 mm (2.3 x 2.0 x 4.8 in) Power supply 15V dc +/- 10%, 50 Hz +/- 1% Power consumption 3.0W (3.5W max. with auto-iris) Image pickup element 1/3" CCD image area sensor (4.9mm H x 3.7mm V) Scanning system 2:1 interlace... - Seite 16 Vorsicht: Um die Gefahr eines elektrischen Schlages zu verrigern AUDIOSIGNALEN darf die Abdckung bzw, das Gehäuse nicht entfernt werden. Es VERANTWORTLICH. befinden sich keine Bauteile im Gerät, die vom Anwender gewartet ULTRAK SCHLIESST werden dürfen. Reparaturen dürfen nur von qualifiziertem HIERMIT JEDE HAFTUNG Fachpersonal durchgeführt werden. FÜR GESETZESWIDRIGEN GEBRAUCH DIESES GERÄTS AUS.
-
Seite 17: Kapitel 1 Kc-3Pe Ccd-Schwarz-Weiss-Überwachungskamera
• KO-60 18m Kabel • KO-500 Kamerahalterung Andere Dinge, die während der Installation benötigt werden und NICHT der KC-3PE Kamera beigepackt sind: • Kameraobjektiv • Überwachungsmonitor • Befestigungsteile Beziehen Sie sich auf Bild 1 zur Identifikation der KC-3PE Kamera. Deutsch... -
Seite 18: Vorderansicht
Unteransicht Hinterer Schärfenring Kamerabefestigungsblock Seitenansicht Schärfenringklemmschraube Ansicht von oben Vorderansicht Hinterer Schärfenring Rückansicht Betriebsanzeige Niveaueinstellung Blendenautomatikeinstellung Blendenautomatikanschluß Interphoneverbindung Blendenanschluß Monitoranschluß BILD 1. KC-3PE Deutsch... -
Seite 19: Manuelle Blendeneinstellung
Stütze müssen an einem stabilen Objekt, wie einer Wandlatte oder einem Deckenbalken befestigt werden, der das Gewicht von Kamera und Halterung aushalten kann. C. Die KC-3PE Überwachungskamera muß einen Kamerabefestigungsblock am Boden des Kameragebäudes haben. Das ¼”-20 UNC Befestigungsgewinde wird auf den Bolzen der Kamerahalterung oder der Stütze geschraubt. -
Seite 20: Installation Und Einstellung Eines Videoobjektivs Mit Blendenautomatik
INSTALLATION UND EINSTELLUNG EINES VIDEOOBJEKTIVS MIT BLENDENAUTOMATIK Die KC-3PE Überwachungskamera unterstützt Videoobjektive mit Blendenautomatik, die sich auf veränderliche Helligkeiten einstellen. Führen Sie die folgenden Schritte durch, um ein Videoobjektiv mit Blendenautomatik zu installieren und einzustellen. Schrauben Sie das Videoobjektiv mit Blendenautomatik in den Objektivsockel. -
Seite 21: Installation Und Einstellung Eines Dc-Blendenobjektivs
Stellen Sie die Lichtniveaueinstellung zurück, gemäß der Beschreibung in Schritt E. INSTALLATION UND EINSTELLUNG EINES DC-BLENDENOBJEKTIVS Die KC-3PE Kamera unterstützt DC-Blendenobjektive. Führen Sie die folgenden Schritte durch, um ein DC-Blendenobjektiv zu installieren und einzustellen. Schrauben Sie das DC-Blendenobjektiv in den Objektivsockel. -
Seite 22: Hintere Schärfeneinstellung
Kamerarückseite. Der Stecker ist polarisiert und kann nur in einer Ausrichtung eingeführt werden. D. Der EI-Schalter muß in der OFF-Stellung sein. Schalten Sie die KC-3PE Kamera ein. Stellen Sie das DC-Blendenobjektiv ein. Benutzen Sie die „IRIS LEVEL“-Einstellung auf der Kamerarückseite, um optimale Bildqualität zu erreichen. -
Seite 23: Hintere Schärfeneinstellung Beim Zoomobjektiv
HINTERE SCHÄRFENEINSTELLUNG BEIM ZOOMOBJEKTIV Das Ziel der hinteren Schärfeneinstellung an einem Zoomobjektiv ähnelt dem, der hinteren Schärfeneinstellung an einer Kamera mit fester Brennweite, außer daß die hintere Schärfeneinstellung auch eingestellt wird, um die Schärfe beim “Zooming” des Objektivs zu bewahren. Wählen Sie einen sehr weit entfernten Gegenstand, den Sie durch das Zoomobjektiv ansehen wollen. - Seite 24 AUDIO Stecken Sie den Stecker von dem mittleren – und dem ON-Kontakt auf den mittleren – und den OFF-Kontakt um, um Klangübertragung zum Monitor abzuschalten G. Unterbrechen Sie die Mikrofonverbindung, indem Sie den weißen – und den schwarzen Draht direkt neben dem Stecker ergreifen und daran ziehen.
-
Seite 25: Kapitel 2 Fehlersuche Und Wartung
KAPITEL 2 FEHLERSUCHE UND WARTUNG FEHLERSUCHE Falls Fehler auftreten, versichern Sie sich zuerst, daß die Kamera gemäß dieser Anleitung installiert und mit anderen Geräten verbunden wurde. Stellen Sie fest in welchem Gerät sich der Fehler befindet und lesen Sie in der Anleitung dieses Gerätes nach. Problem Mögliche Lösung Kein Video... -
Seite 26: Technische Daten
TECHNISCHE DATEN Maße (BxHxT) 58 x 52 x 123 mm (2.3 x 2.0 x 4.8 in) Stromversorgung 15V DC +/- 10%, 50 Hz +/- 1% Stromverbrauch 3.0W (3.5W max. mit Blendenautomatik) Bildaufnahmeelement 8,5mm CCD Bildsensor (4.9mm H x 3.7mm V) Scan-System 2:1 Interlace Scan-Frequenz... - Seite 27 THIS PAGE INTENTIONALLY LEFT BLANK Deutsch...
- Seite 28 L’ENREGISTREMENT DE ATTENTION: AFIN DIMINUER TOUT RISQUE D'ELECTROCUTION NE PAS OUVRIR LE BOITIER OU SIGNAUX VIDEO ET LA FACE ARRIERE. AUDIOPHONIQUES. ULTRAK AUCUNE PIECE REPARABLE PAR L'UTILISATEUR A NE PEUT ËTRE TENU L'INTERIEUR. CONFIEZ TOUTE REPARATION A DU RESONSABLE POUR TOUTE PERSONNEL QUALIFIE.
-
Seite 29: Objet
CHAPITRE 1 CAMERA DE SURVEILLANCE NOIR ET BLANC KC-3PE CCD OBJET La caméra de surveillance noir et blanc KC-3PE CCD offre une solution économique pour les circuits de télévision en circuit fermé et les applications de surveillance. Elle offre les caractéristiques suivantes: •... - Seite 30 Vue de face Bague de retour de mise au point Vue arrière Témoin de mise sous tension Réglage du niveau DC Réglage électronique de l'iris Connexion iris automatique Connexion Connexion iris DC interphone Connexion écran FIGURE 1. CAMERA KC-3PE Français...
-
Seite 31: Reglage Manuel De L'iris
C. La caméra de surveillance KC-3PE est équipée d’un support de fixation attaché au bas de son boîtier. Le trou de montage d’un filet UNC de ¼”-20 se fixe au boulon du pied de la caméra ou de la... -
Seite 32: Installation Et Reglage De L'objectif Auto-Iris De Type Video
INSTALLATION ET REGLAGE DE L’OBJECTIF AUTO-IRIS DE TYPE VIDEO La caméra de surveillance KC-3PE est compatible avec les objectifs de type vidéo à iris automatique afin de s’adapter à des niveaux variables d’intensité lumineuse. Pour installer et régler un objectif vidéo à iris automatique procédez comme suit. -
Seite 33: Installation Et Reglage De L'objectif Iris Dc
Remettez le contrôle de level comme le décrit l’étape E. INSTALLATION ET REGLAGE DE L’OBJECTIF IRIS DC La caméra KC-3PE est compatible avec les objectifs à iris DC. Pour installer et régler un objectif à iris automatique de type DC, procédez comme suit. -
Seite 34: Reglage Du Retour De Mise Au Point
La connexion est polarisée et ne peut être insérée dans la prise que d’une façon. D. Le commutateur EI devrait être sur la position OFF Allumez la caméra KC-3PE. Réglez l’objectif Iris DC afin d’obtenir une photo idéale. Pour obtenir une photo de première qualité utilisez le réglage de l’IRIS Level. -
Seite 35: Reglage Du Retour De Mise Au Point De L'objectif Zoom
G. Réglez la mise au point plus précisément en utilisant la bague de mise au point de l’objectif. H. Retirer l’écran de soudeur de l’objectif. Réglez l’iris de l’objectif afin d’obtenir la meilleure image possible. REGLAGE DU RETOUR DE MISE AU POINT DE L’OBJECTIF ZOOM Le but du retour de mise au point d’un zoom est semblable à... -
Seite 36: Désactivation Du Son
DÉSACTIVATION DU SON Le son de la caméra peut être désactivé si elle est utilisée dans un boîtier. Oter les deux vis Phillips situées sur le dessus de la caméra. Oter les deux vis Phillips situées sur chaque côté de la caméra. C. -
Seite 37: Reparation
CHAPITRE 2 REPARATION ET ENTRETIEN REPARATION En cas de problèmes, assurez-vous que la caméra a été installé en conformité avec les instructions fournies dans ce manuel ou tout autre équipement utilisé. Isolez le problème afin de déceler le matériel en faut et consultez le manuel de l’appareil pour plus d’informations. -
Seite 38: Caracteristiques Techniques
CARACTERISTIQUES TECHNIQUES Dimensions (WxHxD) 58 x 52 x 123 mm (2.3 x 2.0 x 4.8 in) Alimentation 15V dc +/- 10%, 50 Hz +/- 1% Consommation 3.0W (3.5W max. avec iris automatique) Elément de prise d’image 1/3" CCD capteur de surface d’image (4.9mm H x 3.7mm V) Système de balayage 2:1 entrelacement... - Seite 39 THIS PAGE INTENTIONALLY LEFT BLANK Français...
- Seite 40 MONITORAGGIO ED ALLA ELETTRICHE NON REGISTRAZIONE DI APRIRE SEGNALI AUDIO E VIDEO. LA ULTRAK NON POTRÀ ATTENZIONE: PER RIDURRE IL RISCHIP DO SCOSSE ESSERE RITENUTA ELETTRICHE, NON RIMUOVERE LA COPERTURA POSTERIORE. ALL'INTERNO NON VI SONO PARTI SULLE RESPONSABILE PER UN QUALI PUÒ...
-
Seite 41: Funzione
INSTALLAZIONE DEL SISTEMA L'installazione della telecamera KC-3PE deve essere eseguita da personale qualificato, conformemente ai codici elettrici e meccanici locali e nazionali. Per installare la telecamera KC-3PE, eseguire le fasi di cui sotto. Rimuovere tutti i componenti dalla confezione ed identificare quelli che verranno usati durante l'installazione. -
Seite 42: Vista Laterale
Vite di blocco messa a fuoco VISTA DALL'ALTO VISTA ANTERIORE Ghiera di messa a fuoco posteriore VISTA POSTERIORE Spia di accensione Controllo livello c.c. Controllo iride Terminale elettronico iride automatico Connessione Collegamento iride c.c. interfono Collegamento monitor FIGURA 1. TELECAMERA KC-3PE Italiano... -
Seite 43: Regolazione Manuale Dell'obiettivo Con Iride
C. La telecamera di videosorveglianza KC-3PE dispone di un blocco di attacco situato al fondo dell'alloggiamento. Il foro filettato UNC da ¼”-20 si attacca al bullone sul piedistallo della telecamera o alla staffa di montaggio. -
Seite 44: Installazione E Regolazione Di Obiettivi Con Iride Automatico Di Tipo Video
INSTALLAZIONE E REGOLAZIONE DI OBIETTIVI CON IRIDE AUTOMATICO DI TIPO VIDEO La telecamera di videosorveglianza KC-3PE supporta obiettivi con iride automatico di tipo video da regolare secondo il cambiamento del livello di luce. Per installare e regolare un obiettivo con iride automatico di tipo video, eseguire le fasi di cui sotto. -
Seite 45: Installazione E Regolazione Dell'iride C.c
Ripristinare il controllo del livello, come indicato alla fase E. INSTALLAZIONE E REGOLAZIONE DELL'IRIDE C.C. La telecamera KC-3PE consente l'uso di obiettivi con iride c.c. Per installare e regolare un obiettivo con iride automatico di tipo c.c., eseguire le fasi di cui sotto. -
Seite 46: Regolazione Del Fuoco Posteriore
Il connettore è polarizzato e pertanto può essere inserito nella presa in una sola direzione. D. L'interruttore EI deve essere nella posizione OFF. Inviare corrente alla telecamera KC-3PE. Regolare l'obiettivo con iride c.c. per ottenere un'immagine perfetta. Usare il controllo IRIS LEVEL (LIVELLO IRIDE) situato sul retro della telecamera per ottenere la massima qualità. -
Seite 47: Regolazione Del Fuoco Posteriore Dell'obiettivo Di Ingrandimento
Regolare l'iride dell'obiettivo in modo da ottenere immagini della massima qualità. REGOLAZIONE DEL FUOCO POSTERIORE DELL'OBIETTIVO DI INGRANDIMENTO La ghiera di messa a fuoco posteriore di un obiettivo di ingrandimento è simile a quella di una telecamera a lunghezza focale fissa, con l'eccezione che la messa a fuoco posteriore avviene anche per mantenere il fuoco durante l'ingrandimento in avanti o all'indietro dell'obiettivo. -
Seite 48: Regolazione Di Disabilitazione Audio
REGOLAZIONE DI DISABILITAZIONE AUDIO L'audio proveniente dalla telecamera può essere disabilitato per l'uso con un alloggiamento telecamera. Rimuovere le due viti a testa incassata a croce sulla parte superiore della telecamera. Rimuovere le due viti a testa incassata a croce da ciascun lato della telecamera. -
Seite 49: Localizzazione Guasti
SEZIONE 2 LOCALIZZAZIONE GUASTI E MANUTENZIONE LOCALIZZAZIONE GUASTI In caso di problemi, confrontare l'installazione della telecamera con le istruzioni riportate in questo manuale e con quelle delle altre apparecchiature funzionanti. Isolare il problema e fare riferimento al manuale dell'apparecchiatura specifica per ulteriori informazioni in merito. -
Seite 50: Specifiche
SPECIFICHE Dimensioni (LxAxP) 58 x 52 x 123 mm (2,3 x 2,0 x 4,8 pollici) Alimentazione 15V c.c. +/- 10%, 50 Hz +/- 1% Assorbimento di corrente 3,0 W (3,5 W max. con iride automatico) Elemento di presa immagini Sensore area immagini CCD da 1/3"... - Seite 51 THIS PAGE INTENTIONALLY LEFT BLANK Italiano...
-
Seite 52: Printed In Korea
Printed in Korea FORM 2365, REV. 4/98 Italiano...