Inhaltsverzeichnis
Verfügbare Sprachen
Verfügbare Sprachen
Quicklinks
USER'S MANUAL
Elevating Desk
HW67549DE
THIS INSTRUCTION BOOKLET CONTAINS IMPORTANT SAFETY INFORMATION. PLEASE READ AND KEEP FOR FUTURE REFERENCE.
Follow Costway
Please give us a chance to make it right and do better!
Contact our friendly customer service department for help first.
Replacements for missing or damaged parts will be shipped ASAP!
EN
DE
FR
ES
IT
PL
Inhaltsverzeichnis

Verwandte Anleitungen für Costway HW67549DE


Inhaltszusammenfassung für Costway HW67549DE
- Seite 1 USER’S MANUAL Elevating Desk HW67549DE THIS INSTRUCTION BOOKLET CONTAINS IMPORTANT SAFETY INFORMATION. PLEASE READ AND KEEP FOR FUTURE REFERENCE. Follow Costway Please give us a chance to make it right and do better! Contact our friendly customer service department for help first.
-
Seite 2: Before You Start
Contact Us! Do NOT return this item. Contact our friendly customer service department for help first. E-mail US: [email protected] UK: [email protected] Before You Start Before You Start Please read all instructions carefully. Retain instructions for future reference. Separate and count all parts and hardware. -
Seite 3: Product Description
1.Product Description Our advanced intelligent control system combined with the DT0 hand controller series offers many advantages such as low energy consumption with anti-collision technology including plug and play UL certified components. Soft-start and soft-stop technology means anything you have on your desk moves without being jarred or unsteady—even your cup of coffee. -
Seite 4: Parts And Tools
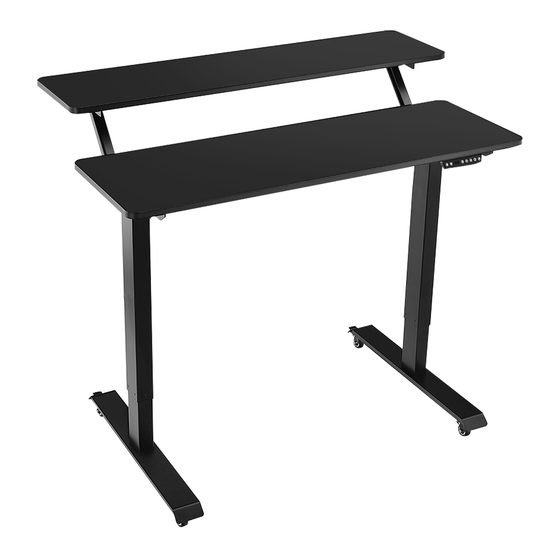
Working cycle 10%,work 2 minutes,Reset 18 Operating Frequency minutes Certification CE / UL / Bifma 5.5 Operating Temperature -20℃—50℃ Colour Black White Grey Height Range (Including 730mm-1220mm panel thickness) 880mm-1370mm Lifting speed 30mm/S Noise Level ≤ 45 db Ambient Temperature -10 °~ 45°... - Seite 5 ① Feet ⑤ Right Lifting Column ② Left Lifting Column ⑥ Left Motor ③ Side Bracket ⑦ Main Worktop ④ Expandable Beam ⑧ 2nd Tier Worktop 4.Assembly Instructions step by step Attach the feet ① to each lifting column ② ⑤ and tighten clockwise with A screws-(8PCS ) using the Allen wrench E as shown, then screw in the foot pads L as shown in the diagram.
- Seite 6 Attach the beam ④ on the right column ⑤ with screws A -(3pcs), then attach the left column ② to the beam with screws A -(3pcs), and tighten the screws clockwise with the Allen wrench E as diagram shows . Attach each side bracket ③...
- Seite 7 Loosen the large nut using the spanner and extend the sync rod then insert into the motor spindle as shown, then twist clockwise to lock, adjust the rod to required length then tighten the screw with a screwdriver as shown. Make sure the small middle beam bracket is facing inwards as shown, then fix the 2nd tier beam with screws -(2 PCS), using the hexagonal screwdriver...
- Seite 8 Attach small worktop on the 2nd tier bracket, place the larger worktop onto the lower bracket. Line up the pre-drilled holes. Use the hexagonal screwdriver and secure clockwise with tapping screws -(13PCS) as shown in the diagram. Edge Lap Attach the 2 cable trays with screws -(4PCS) to the beam, then attach the control to the cable tray with screws -(2PCS) .
- Seite 9 Plug the motor cord into the control box (1PC), then plug in the marked power cord (1PC), then plug in the Digital keypad (1PC) as diagram shown. Dimension Diagram Load 15-20 KG Load 50-55 KG...
-
Seite 10: Memory Function
5.Control System Instructions Elevation Display Lifting buttons Memory Function 1) Initialization Operation When the system is abnormal, or hand controller display the "RST",the lift table needs to be initialized. Press the "DOWN" button until the motor stops,then after 5 seconds,it enters the initialization mode automatically. The "DOWN" button cannot be released at this time. - Seite 11 Once memorized,you can recall any of the 4 heights by pressing the corresponding button of the corresponding height position,then automatically respond to the stored height.To stop,press any key. 4) Height limit setting The system supports the height limit of the desktop. When the current height is set to the height limit of the desktop, press the UP + DOWN button for 5 seconds at the corresponding height, then the buzzer sound will be heard, Cancel the storage height: Method 1: Initialize the system at this time, the...
- Seite 12 6)Sedentary reminder Press button “1”+ “3” at the same time, the hand controller displays “x.xh”. press“UP” or “DOWN”to set a specific time,such as 0.5h, it would exit automatically after 2 seconds,the digital tube will goes out and display a flashing“.”, indicating it is running for a specific time, when the buzzer prompts five times, the hand controller would wake up automatically.
- Seite 13 9)Troubleshooting / Error Codes Error Code Description Solutions The main power supply voltage Check main power exceeds 45V The height deviation between the Reinitialize screw rods exceeds 1cm Hand control connection or Check the hand controller line communication error Blocked off stop Release the button and restart The main power supply failed to start Replace the main power supply, or...
- Seite 14 Motor 2 blocked Reinitialize Motor 2 runs in the wrong Exchange motor wire direction or Hall wire Motor 2 is overloaded Reduce loads Check the connection line The controller is disconnected in series Series signal is wrong Check the connection line, or replace the controller Memory error Replace the controller...
- Seite 15 Welcome to visit our website and purchase our quality products! With your inspiring rating, COSTWAY will be more consistent to offer you EASY SHOPPING EXPERIENCE, GOOD PRODUCTS and EFFICIENT SERVICE! US office: Fontana, California UK office: Ipswich Reward Points Exclusive Customer Service...
-
Seite 16: Elektrischer Schreibtisch
HANDBUCH Elektrischer Schreibtisch HW67549DE DAS HANDBUCH ENTHÄLT WICHTIGE SICHERHEITSHINWEISE. BITTE LESEN UND BEWAHREN SIE FÜR DIE ZUKÜNFTIGE VERWENDUNG AUF. Folgen Costway Bitte geben Sie uns eine Chance, es zu korrigieren und besser zu machen! Wenden Sie sich zunächst an unseren freundlichen Kundendienst. -
Seite 17: Vor Dem Beginnen
Kontaktieren Sie uns! Senden Sie diesen Artikel NICHT zurück. Wenden Sie sich zunächst an unseren freundlichen Kundendienst. E-mail DE:[email protected] Vor dem Beginnen Bitte lesen Sie alle Anweisungen sorgfältig durch. Bewahren Sie die Anweisungen zum zukünftigen Verwendung auf. Separieren und zählen Sie alle Teile und Hardware. -
Seite 18: Produktbeschreibung
1.Produktbeschreibung Unser fortschrittliches intelligentes Steuerungssystem in Kombination mit der Handsteuerungsserie DT0 bietet viele Vorteile wie einen geringen Energieverbrauch mit Antikollisionstechnologie einschließlich Stecker. Soft-Start-Technologie und Soft-Stop-Technologie bedeutet, dass sich alles, was Sie auf Ihrem Schreibtisch haben, bewegt, ohne gestört oder unsicher zu werden - sogar Ihre Tasse Kaffee. Die Bewegung unseres Tisches ist sehr ruhig und absolut stabil bei extrem geringem Rauschen. - Seite 19 Arbeitszyklus 10% , 2 Minuten arbeiten, 18 Minuten Arbeitsfrequenz zurücksetzen Zertifizierung CE / UL / Bifma 5,5 Betriebstemperatur -20℃—50℃ Farbe Schwarz Weiß Grau Höhenbereich 730mm-1220mm (einschließlich 880mm-1370mm Plattendicke) Hubgeschwindigkeit 30mm/S Geräuschpegel ≤ 45 db Umgebungstemperatur -10 ~ 45° C 3. Teile und Werkzeuge Schrauben Schrauben Kappen(X2)...
- Seite 20 ① Füße ⑤ Rechtes Bein ② Linkes Bein ⑥ Hubmotor ③ Seitenhalterung ⑦ Hauptarbeitsplatte ④ Erweiterbarer Balken ⑧ Nebene Arbeitsplatte 4. Montageanleitung Befestigen Sie die Füße ① an jedem Bein ② ⑤ und ziehen Sie sie mit den Schrauben A (8 Stück) im Uhrzeigersinn mit dem Inbusschlüssel E wie gezeigt fest. Schrauben Sie dann die Fußpolster L wie in der Abbildung gezeigt ein.
- Seite 21 Befestigen Sie den Balken ④ am rechten Bein ⑤ mit den Schrauben A (3 Stück), befestigen Sie dann das linke Bein ② mit den Schrauben A (3 Stück) am Balken und ziehen Sie die Schrauben im Uhrzeigersinn mit dem Inbusschlüssel E fest, wie in der Abbildung gezeigt.
- Seite 22 Lösen Sie die große Mutter mit dem Schraubenschlüssel G und ziehen Sie die Synchronstange heraus. Setzen Sie sie dann wie gezeigt in die Motorspindel ein. Drehen Sie sie dann im Uhrzeigersinn, um sie zu arretieren. Stellen Sie die Stange auf die gewünschte Länge ein und ziehen Sie die Schraube mit einem Schraubendreher F wie gezeigt fest.
- Seite 23 Bringen Sie eine kleine Arbeitsplatte an der zweiten Halterung an und setzen Sie die größere Arbeitsplatte auf die untere Halterung. Richten Sie die vorgebohrten Löcher aus. Verwenden Sie den Sechskantschraubendreher F und befestigen Sie ihn im Uhrzeigersinn mit den Schrauben C (13 Stück), wie in der Abbildung gezeigt. Edge Lap Befestigen Sie die 2 Kabelrinnen mit den Schrauben D (4 Stück) am Balken und befestigen Sie die Steuerbox mit den Schrauben D (2 Stück) an der Kabelrinne.
- Seite 24 Stecken Sie das Motorkabel in die Steuerbox K (1 Stück), stecken Sie dann das markierte Netzkabel M (1 Stück) ein und stecken Sie das Bedienfeld J (1 Stück) wie in der Abbildung gezeigt ein. Maße Load 15-20 KG Load 50-55 KG...
- Seite 25 5. Anweisungen des Steuerungssystems Höhenanzeige Aufzugknopf Speicherfunktion 1) Initialisierungsvorgang Wenn das System abnormal ist oder die Handsteuerung „RST“ anzeigt, muss der Hubtisch initialisiert werden. Drücken Sie die Taste „DOWN“, bis der Motor stoppt. Nach 5 Sekunden wechselt er automatisch in den Initialisierungsmodus. Lassen Sie die Taste „DOWN“...
-
Seite 26: Automatizität-Testen
4) Einstellung der Höhenbegrenzung Das System unterstützt die Höhenbeschränkung des Desktops. Wenn die aktuelle Höhe auf die Höhenbeschränkung des Desktops eingestellt ist, drücken Sie die Taste „UP“ + „DOWN“ 5 Sekunden lang in der entsprechenden Höhe. Dann ertönt der Summerton. Abbrechen der Speicherhöhe: Methode 1: Initialisieren Sie das System zu diesem Zeitpunkt, die Systemhöhenbegrenzung wird aufgehoben. - Seite 27 8) Die internen Parameter und Einstellungen für die Installationshöhe Wenn Sie die Taste „SET“ 5 Sekunden lang drücken, können Sie die Einstelloberfläche aufrufen. Sie zeigt „S-x“ an und „x“ blinkt, wobei „x“ die Parametergruppe ist. Drücken Sie „SET“, um die Parametergruppe einzugeben und die entsprechenden Parameter einzustellen. Drücken Sie „UP“...
-
Seite 28: Beschreibung
9) Fehlerbehebung / Fehlercodes Fehlercode Beschreibung Lösungen Die Hauptversorgungsspannung Überprüfen Sie die Hauptstromversorgung überschreitet 45V Die Höhenabweichung zwischen den Ziehen Sie die Schrauben wieder an Schraubenstangen überschreitet 1 cm Handsteuerungsverbindung oder Überprüfen Sie die Kommunikationsfehler Handsteuerungsleitung Stopp blockiert Lassen Sie die Taste los und starten Sie neu Die Hauptstromversorgung konnte nicht Ersetzen Sie die Hauptstromversorgung oder gestartet werden und liegt unter 20V... -
Seite 29: Elektrische Sicherheitshinweise
Motor 2 blockiert Neu initialisieren Motor 2 läuft in die falsche Motorkabel oder Hallkabel Richtung austauschen Motor 2 ist überlastet Lasten reduzieren Überprüfen Sie die Die Steuerung ist in Reihe Verbindungsleitung geschaltet Überprüfen Sie die Das Seriensignal ist falsch Verbindungsleitung oder tauschen Sie die Steuerung aus Speicherfehler Ersetzen Sie die Steuerung... -
Seite 30: Sterne Bewertung
Ihre Vorschläge und Kommentare für COSTWAY sind wirklich wichtig für uns! Mit Ihrer inspirierenden Bewertung wird COSTWAY konsistenter sein, um Ihnen EIN SCHÖNES EINKAUFSERLEBNIS, GUTE PRODUKTE und EFFIZIENTEN SERVICE zu bieten! DE office:FDS GmbH,Neuer Höltigbaum 36,22143 Hamburg,Deutschland Belohnungspunkte Exklusiver Kundendienst... - Seite 31 MANUEL DE L’UTILISATEUR Bureau Réglable en Hauteur HW67549DE CE MANUEL D’INSTRUCTIONS CONTIENT DES INFORMATIONS IMPORTANTES SUR LA SÉCURITÉ. VEUILLEZ LIRE ET CONSERVER POUR LA RÉFÉRENCE FUTURE. Suivez Costway VEUILLEZ NOUS DONNER UNE OCCASION DE L’AMELIORER ET FAIRE MIEUX! Contactez d’abord notre service à la clientèle amical pour l’aide.
-
Seite 32: Contactez-Nous
Contactez-nous ! Ne retournez pas cet article. Contactez d’abord notre service à la clientèle amical pour l’aide. E-mail FR : [email protected] Avant de Commencer Veuillez lire attentivement toutes les instructions. Conservez les instructions pour la référence future. Séparez et comptez toutes les pièces et les outils de matériel. -
Seite 33: Description Du Produit
1. Description du produit Notre système de contrôle intelligent avancé combiné à la série de contrôleurs manuels DT0 offre de nombreux avantages tels qu’une faible consommation d'énergie, une technologie anti-collision et des composants « connecter et jouer » certifiés UL. La technologie de démarrage et d'arrêt en douceur signifie que tout ce que vous avez sur votre bureau bouge sans être secoué... - Seite 34 Cycle de travail 10%, travail 2 minutes, Réinitialisation 18 Fréquence de minutes fonctionnement Certification CE / UL / Bifma 5,5 Température de -20℃—50℃ fonctionnement Couleur Noir Blanc Gris Gamme de hauteur (y 730mm-1220mm compris l'épaisseur des 880mm-1370mm panneaux) Vitesse de levage 30mm/S Niveau de bruit ≤...
- Seite 35 ① Pied ⑤ Colonne de levage droit ② Colonne de levage gauche ⑥ Moteur gauche ③ Support latéral ⑦ Plan de travail principal ④ Poutre extensible ⑧ Plan de travail de 2e niveau 4. Étapes d’assemblage Fixez les pieds ① à chaque colonne de levage ②⑤ et serrez dans le sens des aiguilles d’une montre avec les vis (A x8) à...
- Seite 36 Fixez la poutre ④ sur la colonne de droite ⑤ avec les vis (Ax3), puis fixez la colonne de gauche ② à la poutre avec les vis (Ax3), et serrez les vis dans le sens des aiguilles d'une montre avec la clé Allen (E) comme indiqué sur le schéma . Fixez chaque support latéral ③...
- Seite 37 Desserrez le grand écrou à l’aide de la clé (G) et étendez la tige de synchronisation puis insérez dans la tige du moteur comme indiqué, puis tournez-la dans le sens des aiguilles d'une montre pour la bloquer, ajustez la tige à la longueur requise puis serrez la vis avec un tournevis (F) comme indiqué.
- Seite 38 Fixez le petit plan de travail sur le support du deuxième étage, puis placez le grand plan de travail sur le support inférieur. Alignez les trous pré-percés. Utilisez un tournevis hexagonal (F) et fixez-le dans le sens des aiguilles d’une montre à l’aide de vis (Cx13) comme indiqué...
- Seite 39 Branchez le cordon du moteur dans le boîtier de contrôle (K), puis branchez le cordon d’alimentation (M), puis branchez le clavier numérique (J) comme indiqué sur le schéma. Dimension Charge 15-20 KG Charge 50-55 KG...
- Seite 40 5. Instructions du système de contrôle. Affichage d’élévation Boutons de levage Fonction de mémoire 1) Opération d’initialisation Lorsque le système est anormal, ou que la commande manuelle affiche « RST », la table doit être initialisée. Appuyez sur le bouton « DOWN » jusqu’à ce que le moteur s’arrête, puis appuyez sur le bouton «...
- Seite 41 4) Réglage de la limite de hauteur Le système peut régler la limite de hauteur du bureau. Lorsque la hauteur actuelle est réglée sur la limite de hauteur du bureau, appuyez sur le bouton « UP » et « DOWN » pendant 5 secondes à la hauteur correspondante, puis le son du bipeur se fera entendre.
- Seite 42 Les paramètres peuvent être définis comme suit : A. « S-1 » : 0 signifie affichage métrique, 1 signifie affichage en pouces. B. « S-2 » : signifie la précision du capteur bloqué, 0 signifie désactivé, 8 est le plus sensible et 1 est le moins sensible.
- Seite 43 9) Dépannage / Codes d'erreur Code d’erreur Cause Solution La tension d’alimentation principale Vérifiez l’alimentation principale dépasse 45V L’écart de hauteur entre les tiges Initialisez le système filetées dépasse 1 cm Erreur de connexion ou de Vérifiez la ligne du contrôleur manuel communication contrôleur manuel Arrêt bloqué...
- Seite 44 Le moteur 2 est bloqué Initialisez le système Le moteur 2 tourne dans la Échangez du fil de moteur ou mauvaise direction du fil de Hall Le moteur 2 est surchargé Réduisez la charge Vérifiez la ligne de connexion Le contrôleur est déconnecté...
- Seite 45 Bienvenue pour visiter notre site et acheter nos produits de qualité! Avec votre évaluation inspirante, COSTWAY sera plus professionnel pour vous offrir une BONNE EXPÉRIENCE D’ACHATS, de BONS PRODUITS et un SERCIVE EFFICACE ! FR office : 26 RUE DU VERTUQUET, 59960 NEUVILLE EN FERRAIN, FRANCE Points de Récompense...
- Seite 46 MANUAL DEL USUARIO Escritorio de Pie Ajustable HW67549DE ESTE MANUAL DE INSTRUCCIONES CONTIENE IMPORTANTES INFORMACIONES DE SEGURIDAD, POR FAVOR LO LEA Y GUARDE PARA REFERENCIAS FUTURAS. Siga Costway ¡Por favor dénos la oportunidad de hacerlo bien y mejorar! Primero póngase en contacto con nuestro amable departamento de servicio al cliente para obtener ayuda.
-
Seite 47: Antes De Empezar
¡Contáctenos! NO devuelva este artículo. Primero póngase en contacto con nuestro amable departamento de servicio al cliente para obtener ayuda. Antes de Empezar Por favor lea todas instrucciones con mucha atención. Retenga instrucciones para referencias futuras. Separe y cuente todas las piezas y accesorios. Lea cada paso cuidadosamente y siga el orden correcto. -
Seite 48: Descripción Del Producto
1. Descripción del Producto Nuestro avanzado sistema de control inteligente combinado con la serie de controladores manuales DT0 ofrece muchas ventajas, como un bajo consumo de energía con tecnología de anticolisión que incluye componentes "plug and play" ("enchufar y jugar") certificados por UL. - Seite 49 Ciclo de trabajo 10 %, trabajo 2 minutos, reinicio 18 Frecuencia de operación minutos Certificación CE / UL / Bifma 5,5 Temperatura de -20℃—50℃ funcionamiento Color Negro Blanco Gris Rango de altura (incluido 730mm-1220mm el grosor del panel) 880mm-1370mm Velocidad de elevación 30mm/S Nivel de ruido ≤...
- Seite 50 ① Pata ⑤ Columna de elevación derecha ② Columna de elevación izquierda ⑥ Motor izquierdo ③ Soporte lateral ⑦ Tabla de trabajo principal ④ Viga extensible ⑧ Tabla de trabajo de segundo nivel 4. Pasos de Montaje Fije las patas ① a cada columna de elevación ② ⑤ y apriete en el sentido de las agujas del reloj con los tornillos (A x8) utilizando la llave Allen (E) como se muestra, luego atornille las almohadillas para patas (L) como se muestra en la imagen.
- Seite 51 Fije la viga ④ a la columna derecha ⑤ con los tornillos (Ax3), luego fije la columna izquierda ② a la viga con los tornillos (Ax3), y apriete los tornillos en el sentido de las agujas del reloj con la llave Allen (E) como se muestra en la imagen. Fije cada soporte lateral ③...
- Seite 52 Afloje la tuerca grande con la llave (G) y extienda la varilla de sincronización, luego insértela en el husillo del motor como se muestra, luego gírela en el sentido de las agujas del reloj para bloquear, ajuste la varilla a la longitud requerida y luego apriete el tornillo con un destornillador (F) como se muestra.
- Seite 53 Fije la tabla de trabajo pequeña al soporte del segundo nivel, luego coloque la tabla de trabajo grande en el soporte inferior. Alinee los orificios pretaladrados. Utilice el destornillador hexagonal (F) y fíjelos en el sentido de las agujas del reloj con los tornillos autorroscantes (Cx13) como se muestra en la imagen.
- Seite 54 Enchufe el cable del motor en la caja de control (K), luego enchufe el cable de alimentación (M), luego enchufe el teclado digital (J) como se muestra en la imagen. Diagrama de Dimensiones Carga 15-20 KG Carga 50-55 KG...
- Seite 55 5. Instrucciones del Sistema de Control Pantalla de Elevación Botones de Elevación Función de Memoria 1) Operación de Inicialización Cuando el sistema es anormal o el controlador de mano muestra "RST", la mesa debe inicializarse. Presione el botón "DOWN" hasta que el motor se detenga, luego, después de 5 segundos, entra automáticamente en el modo de inicialización.
- Seite 56 4) Ajuste del Límite de Altura El sistema admite el límite de altura del escritorio. Cuando la altura actual se establece en el límite de altura del escritorio, presione el botón "UP" y "DOWN" durante 5 segundos a la altura correspondiente, luego se escuchará...
- Seite 57 Los parámetros se pueden configurar de la siguiente manera: A. "S-1": 0 significa visualización métrica, 1 significa visualización en pulgadas. B. "S-2": significa la precisión del sensor bloqueado, 0 significa apagado, 8 es el más sensible y 1 es el menos sensible. C.
- Seite 58 8) Solución de Problemas / Códigos de Error Código de error Causa Solución El voltaje de la fuente de alimentación Verifique la energía principal principal supera los 45 V La desviación de altura entre las Reinicialice el sistema varillas roscadas supera 1 cm. Error de conexión del control manual Verifique la línea del controlador de y de comunicación...
- Seite 59 El motor 2 está bloqueado Reinicialice el sistema El motor 2 funciona en la Intercambie el cable del motor dirección incorrecta o el cable Hall El motor 2 está sobrecargado Reduzca la carga Verifique la línea de conexión El controlador está desconectado en serie Verifique la línea de conexión La señal de la serie es...
- Seite 60 ¡Bienvenido a visitar nuestro sitio web y comprar nuestros productos de alta calidad! ¡Con su calificación inspiradora, COSTWAY será más consistente para ofrecerle EXPERIENCIA DE COMPRA CONVENIENTE, BUENOS PRODUCTOS y SERVICIO EFICIENTE! EE.UU.: Fontana, California Reino Unido: Ipswich Puntos de recompensa...
-
Seite 61: Scrivania Regolabile In Altezza
MANUALE UTENTE Scrivania Regolabile in Altezza HW67549DE QUESTO MANUALE DI ISTRUZIONI CONTIENE IMPORTANTI INFORMAZIONI SULLA SICUREZZA. SI PREGA DI LEGGERE E CONSERVARE PER RIFERIMENTO FUTURO. Seguire Costway Vi preghiamo di darci la possibilità di fare bene e fare di meglio! Per prima cosa contatta il nostro servizio di assistenza clienti. -
Seite 62: Prima Di Iniziare
Contattaci! NON restituire questo articolo. Per prima cosa contatta il nostro servizio di assistenza clienti. E-mail IT: [email protected] Prima di iniziare Si prega di leggere attentamente tutte le istruzioni. Conservare le istruzioni per riferimento futuro. Separare e contare tutte le parti e l'hardware. -
Seite 63: Descrizione Del Prodotto
1. Descrizione del Prodotto Il nostro sistema di controllo intelligente avanzato combinato con la serie di controllo manuale DT0 offre molti vantaggi come il basso consumo energetico con tecnologia anti-collisione, inclusi componenti “collegare e usare” certificati UL. La tecnologia “soft-start” e “soft-stop” significa che tutto ciò... - Seite 64 Ciclo di lavoro 10%, lavorare 2 minuti, Ripristinare 18 Frequenza operativa minuti Certificazione CE / UL / Bifma 5,5 Temperatura -20℃—50℃ dell’operazione Colore Nero Bianco Grigio Intervallo di altezza 730mm-1220mm (compreso lo spessore del 880mm-1370mm pannello) Velocità di sollevamento 30mm/S Livello di rumore ≤...
- Seite 65 ① Piede ⑤ Colonna di sollevamento destra ② Colonna di Sollevamento Sinistra ⑥ Motore sinistro ③ Supporto Laterale ⑦ Piano di lavoro principale ④ Trave Espandibile ⑧ Banco da lavoro al secondo piano 4. Istruzioni di Montaggio Fissare i piedi ① a ciascuna colonna di sollevamento ② ⑤ e serrare in senso orario con le viti (A) (A x 8) utilizzando la chiave a brugola (E) come mostrato, e poi avvitare i cuscinetti dei piedi (L) come mostrato nel diagramma.
- Seite 66 Attaccare la trave ④ sulla colonna di destra ⑤ con le viti (A) (A x 3), collegare la colonna sinistra ② alla trave con le viti (A) (A x 3), stringere le viti in senso orario con la chiave a brugola (E) come mostrato nel diagramma. Attaccare ciascuno supporto laterale ③...
- Seite 67 Allentare il dado grande utilizzando la chiave (G) ed estendere l'asta di sincronizzazione, quindi inserirla nel mandrino del motore come mostrato, e poi ruotare in senso orario per bloccare, regolare l'asta alla lunghezza richiesta, quindi serrare la vite con un cacciavite (F) come mostrato nel diagramma. Assicurarsi che il piccolo supporto della trave centrale sia rivolta verso l'interno come mostrato, e poi fissare la trave del secondo piano con le viti (I) (Ix4), utilizzando il cacciavite esagonale (F) per fissare il centro della trave al piano di...
- Seite 68 Attaccare il piano di lavoro piccolo sul supporto del secondo livello, posizionare il piano di lavoro più grande sul supporto inferiore. Allineare i fori preforati. Utilizzare il cacciavite esagonale (F) e fissare in senso orario con le viti autofilettanti (C) (Cx4) come mostrato nel diagramma.
- Seite 69 Collegare il cavo del motore al dispositivo di controllo (Kx1), e collegare il cavo di corrente contrassegnato (Mx1), e poi collegare la tastiera digitale (Jx1) come mostrato nel diagramma. Diagramma dimensionale Carico 15-20 KG Carico 50-55 KG...
- Seite 70 5. Istruzioni per il sistema di controllo Visualizzazione dell'elevazione Pulsanti di sollevamento Funzione di memoria 1) Operazione di inizializzazione Quando il sistema è anomalo o il controllo manuale visualizza "RST", è necessario inizializzare il piano di sollevamento. Premere il pulsante "DOWN" fino all'arresto del motore, quindi dopo 5 secondi entra automaticamente in modalità...
- Seite 71 4) Impostazione del limite di altezza Il sistema supporta il limite di altezza del piano. Quando l'altezza corrente è impostata sul limite di altezza del piano, premere il pulsante "UP" e "DOWN" per 5 secondi all'altezza corrispondente, quindi si sentirà il suono del cicalino. Annullare altezza di archiviazione: Metodo 1: Inizializzare il sistema in questo momento, il limite di altezza del sistema viene annullato.
- Seite 72 I parametri possono essere impostati come segue: A. "S-1" 0 significa display metrico, 1 significa display in pollici. B. "S-2" indica la precisione del sensore bloccato, 0 significa spento, 8 è il più sensibile e 1 è il meno sensibile. C.
- Seite 73 8) Risoluzione dei problemi / Codici di errore Codice di errore Descrizione Soluzioni La tensione di corrente principale Verifique la energía principal supera i 45V La deviazione in altezza tra le aste Reinicialice el sistema delle viti supera 1 cm Collegamento del controllo manuale o Verifique la línea del controlador de errore di comunicazione...
- Seite 74 Motore 2 bloccato Reinizializzare Il motore 2 gira nella Scambiare il cavo del motore direzione sbagliata o il cavo Hall Il motore 2 è sovraccarico Ridurre i carichi Controllare la linea di Il controller è scollegato collegamento in serie Controllare la linea di Il segnale della serie collegamento o sostituire è...
- Seite 75 Benvenuti a visitare il nostro sito Web e acquistare i nostri prodotti di qualità! Con il tuo commento stimolante, COSTWAY continuerà a offrirti FACILITÀ DI ACQUISTO FACILE, PRODOTTI BUONI e SERVIZIO EFFICIENTE! US ufficio: Fontana, California UK ufficio: Ipswich Punti del premio...
-
Seite 76: Instrukcja Obsługi
INSTRUKCJA OBSŁUGI Biurko z regulacją wysokości HW67549DE NINIEJSZA INSTRUKCJA ZAWIERA ISTOTNE INFORMACJE DOTYCZĄCE BEZPIECZEŃSTWA. PROSIMY O ZAPOZNANIE SIĘ Z NIĄ I ZACHOWANIE JEJ DO WGLĄDU W PRZYSZŁOŚCI. W razie kłopotów skontaktuj się z nami! Śledź Costway Jeśli potrzebujesz pomocy skontaktuj się z naszym przyjaznym działem obsługi klienta. -
Seite 77: Zanim Zaczniesz
Skontaktuj się z nami! Nie zwracaj tego produktu. Jeśli potrzebujesz pomocy, skontaktuj się z naszym przyjaznym działem obsługi klienta. E-mail PL: [email protected] Zanim Zaczniesz Zapoznaj się z instrukcją. Zachowaj instrukcję do wglądu. Upewnij się, że zestaw jest kompletny. Zapoznaj się ze sposobem montażu i postępuj zgodnie z instrukcją. -
Seite 78: Opis Produktu
1.OPIS PRODUKTU Nasz zaawansowany system sterowania w połączeniu z serią kontrolerów ręcznych DT0 jest w stanie zaoferować naprawdę wiele! Niskie zużycie energii, technologia antykolizyjna i funkcja typu „połącz i graj” z certyfikatem UL. Zastosowana technologia płynnej regulacji zapewnia, że wszystko, co masz na biurku, porusza się bez wstrząsów, nie powodując niestabilności - nawet filiżanka kawy. - Seite 79 Cykl pracy 10%, praca 2 minuty, reset 18 minut Częstotliwość robocza Certyfikacja CE / UL / Bifma 5,5 Temperatura pracy (zakres) -20℃—50℃ Kolor Czarny biały szary Zakres wysokości 730 mm-1220 mm (łącznie z grubością 880 mm-1370 mm panelu Prędkość podnoszenia 30mm/S Poziom hałasu ≤...
- Seite 80 ① Nóżka ⑤ Prawa kolumna podnosząca ② Lewa kolumna podnosząca ⑥ Silnik lewy ③ Boczny wspornik ⑦ Główny zakres działania ④ Wysuwana kolumna ⑧ Zakres działania II stopnia 4.Etapy montażu Zamocuj nóżki ① na każdej kolumnie podnoszącej ②⑤ i dokręć zgodnie z ruchem wskazówek zegara za pomocą...
- Seite 81 Zabezpiecz wysuwaną kolumnę ④ w prawej kolumnie ⑤ śrubami (Ax3), a następnie zamocuj lewą kolumnę ② do belki za pomocą śrub (Ax3) i dokręć je zgodnie z ruchem wskazówek zegara za pomocą klucza imbusowego (E), jak pokazano na ilustracji. Zamocuj wsporniki boczne ③ na każdej kolumnie podnoszącej ②⑤ jak pokazano na rysunku i dokręć...
- Seite 82 Poluzuj dużą nakrętkę za pomocą klucza (G) i wysuń pręt pozycjonujący, a następnie włóż go do pręta silnika (jak pokazano na rysunku), a następnie obróć w prawo, aby go zablokować; wyreguluj pręt do wymaganej długości, a następnie dokręć śrubę śrubokrętem ( F), jak pokazano na rysunku. Upewnij się, że mały wspornik belki środkowej jest skierowany do wewnątrz, jak pokazano na rysunku, a następnie przymocuj belkę...
- Seite 83 Przymocuj mały blat do wspornika drugiego poziomu stolika, a następnie umieść duży blat na wsporniku dolnym. Wyrównaj wstępnie wywiercone otwory. Użyj śrubokręta sześciokątnego (F) i zabezpiecz go śrubami (Cx13) w kierunku zgodnym z ruchem wskazówek zegara, jak pokazano na ilustracji. Połączenie krawędzi Przymocuj koryto kablowe śrubami (Dx4) do belki, a następnie przymocuj skrzynkę...
- Seite 84 Podłącz przewód silnika do skrzynki sterowniczej (K), następnie podłącz przewód zasilający (M). Podłącz klawiaturę (J), jak pokazano na rysunku. Wymiary Maks. obciążenie 15-20 KG Maks. obciążenie 50-55 KG...
- Seite 85 5. Instrukcje systemu sterowania. Wyświetlanie wysokości Przyciski podnoszenia Funkcja pamięci 1) Operacje wstępne Gdy system działa nieprawidłowo lub na wyświetlaczu wyświetla się komunikat „RST”, tabela musi zostać zainicjowana. Naciśnij przycisk „DOWN”, aż silnik się zatrzyma, następnie naciśnij i przytrzymaj „DOWN” przez 5 sekund. System automatycznie przejdzie w tryb inicjalizacji.
- Seite 86 4) Regulacja ograniczenia wysokości System może regulować limit wysokości biurka. Gdy aktualna wysokość jest ustawiona na limit wysokości biurka, naciśnij i przytrzymaj przycisk „UP” i „DOWN” na 5 sekund, na odpowiedniej wysokości; następnie rozlegnie się sygnał dźwiękowy. Aby anulować zarejestrowaną wysokość: Metoda 1: Zainicjuj system w tym momencie;...
- Seite 87 Parametry można zdefiniować w następujący sposób: A. „S-1”: 0 oznacza wyświetlanie metryczne, 1 oznacza wyświetlanie w calach. B. „S-2”: oznacza dokładność zablokowanego czujnika, 0 oznacza "wyłączony", 8 - największa czułość, a 1 - najmniejsza czułość. C. „S-3”: oznacza dokładność zablokowanej wartości prądu przy podnoszeniu, 0 oznacza wyłączone, 8 - największa czułość, a 1 najmniejsza czułość.
- Seite 88 8) Rozwiązywanie problemów / kody błędów Kod błędu Przyczyna ROZWIĄZANIE Główne napięcie zasilania przekracza Sprawdź główne zasilanie Różnica wysokości między prętami Dokonaj inicjalizacji systemu gwintowanymi przekracza 1 cm Ręczne podłączenie sterownika lub Sprawdź przewód sterownika błąd komunikacji systemu ręcznego Zatrzymanie uległo zablokowaniu Zwolnij przycisk i uruchom ponownie Wymień...
- Seite 89 Silnik 2 jest zablokowany Dokonaj inicjalizacji systemu Silnik 2 obraca się w złym Wymień przewód silnika lub kierunku przewód Halla Silnik 2 jest przeciążony Nie przeciążaj silnika Sprawdź połączenia Kontroler jest odłączony szeregowo Sprawdź przewód łączący lub Sygnał szeregowy jest wymień...
- Seite 90 Zapraszamy do odwiedzenia naszej strony internetowej! Twoja ocena nas inspiruje! Dzięki niej COSTWAY będzie dążył do zaoferowania ci WYDAJNEJ OBSŁUGI, DOBRYCH PRODUKTÓW I BEZPROBLEMOWYCH ZAKUPÓW! PL office: Gdańsk punkty lojalnościowe doskonała obsługa klienta personalizowane rekomendacje karta stałego klienta historia zamówień...